Install an ActZero VM on Azure
Estimated Time to Complete: 30 minutes
Installing an ActZero virtual machine (VM) in your environment enables ActZero to collect the log file information it needs to monitor and detect events in your environment for signs of suspicious activity and initiate network vulnerability scans.
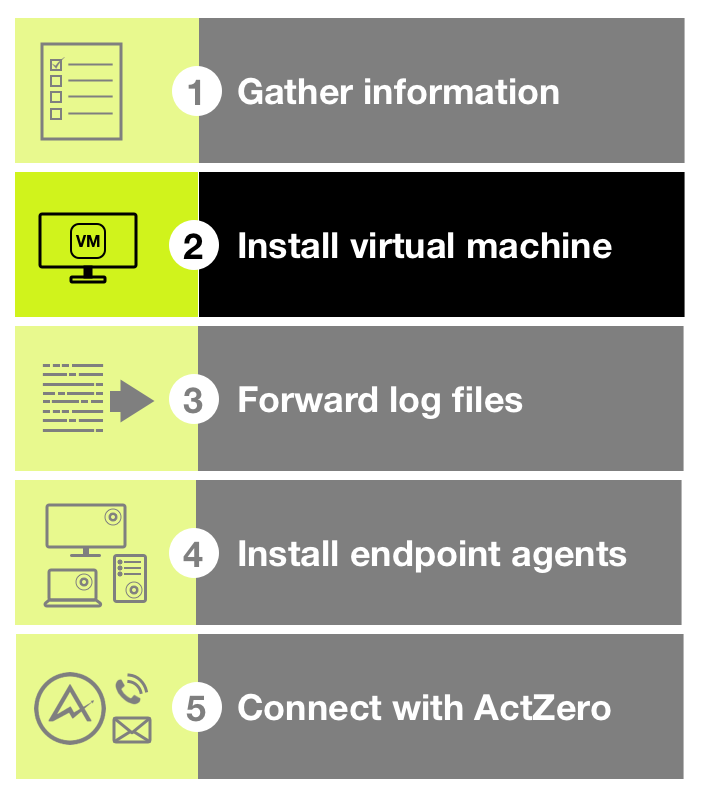
Use the following instructions to provision a VM by installing a VM in Azure. Setting up an ActZero VM is the second step in the overall ActZero onboarding process; refer to Get Started for an outline of the onboarding steps.
Install a VM on Azure
- Log in to the Azure Portal
-
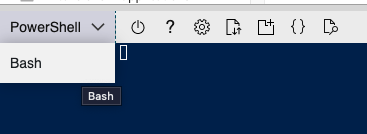
Open a cloud shell

-
Switch to bash
-
From the cloud shell menu, upload the
cloud-config.ymlfile provide by your Technical Account Manager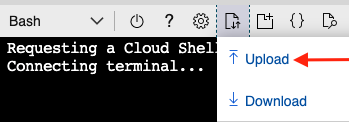
-
Run the below command in the cloud shell to create the VM.
replace <resource_group_name> with the actual resource group used in Azure, and replace <location name> with the location (e.g.
eastus) and <tenant_name> with the tenant name provided by your Technical Account Manager. (If you do not specify a location, azure will choose the location nearest to you.) This will ensure the hostname is set properly and allows ActZero to identify and manage the asset. If multiple VMs are to be deployed name then usetenant_name-0X. e.g.actzero-01,actzero-02, etc.az vm create \ --location <location name> \ --resource-group <resource_group_name> \ --name <tenant_name> \ --size Standard_D4_v3 \ --image Canonical:0001-com-ubuntu-minimal-jammy:minimal-22_04-lts:22.04.202211010 \ --admin-username monitor \ --generate-ssh-keys \ --custom-data cloud-config.yml -
If Standard_D4_v3 is not available in your zone, choose a size that includes 4 vCPU and a minimum 8 GB RAM from the Azure VM selector.
-
The CLI will output the result that should look as follows:
{ "fqdns": "", "id": "/subscriptions/ec3fab8c-94e1-49ce-bdd5-b46c2bbab2e0/resourceGroups/<resource_group_name>/providers/Microsoft.Compute/virtualMachines/<vm_name>", "location": "eastus", "macAddress": "00-0D-3A-8F-FC-F0", "powerState": "VM running", "privateIpAddress": "10.0.0.6", "publicIpAddress": "52.249.176.135", "resourceGroup": "<resource_group_name>", "zones": "" } -
From the CLI change the permission of the private key using
chmod 400 .ssh/id_rsa -
From the CLI connect to the VM using
ssh -i .ssh/id_rsa monitor@52.249.176.135- replace
52.249.176.135with the actual public IP from the previous output - type yes when prompted about the fingerprint.
- replace
-
at the VM prompt run the following to confirm that a VPN tunnel has been set up.
ifconfig prod- this should result in an output showing the prod virtual adapter
monitor@examplevm:~$ ifconfig prod
    prod: flags=4305<UP,POINTOPOINT,RUNNING,NOARP,MULTICAST>  mtu 1422
    inet 172.31.255.217  netmask 255.255.255.255  destination 172.31.255.217
    inet6 fe80::fca6:ac50:185a:8250  prefixlen 64  scopeid 0x20<link>
    unspec 00-00-00-00-00-00-00-00-00-00-00-00-00-00-00-00  txqueuelen 500  (UNSPEC)
    RX packets 1640  bytes 148520 (148.5 KB)
    RX errors 0  dropped 0  overruns 0  frame 0
    TX packets 1650  bytes 134995 (134.9 KB)
    TX errors 0  dropped 0 overruns 0  carrier 0  collisions 0
prod: error fetching interface information: Device not found- if the connection could not be established the output should show the following, please have your Technical Account Manager escalate to support for troubleshooting.
-
log out of the VM with this command
exit -
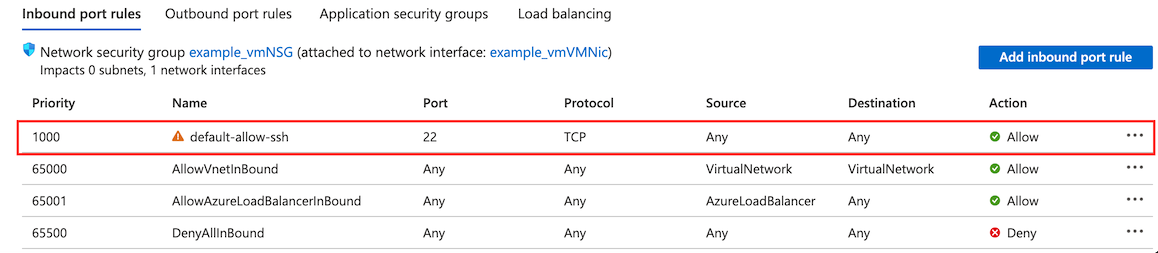
Navigate to networking and remove the default inbound SSH rule.
-
If security policies require strict egress filtering, ensure that the following are allowed outbound from the VM
-
UDP: 4501 to:
- 44.226.24.37/32 - 44.231.182.136/32 - 52.41.50.196/32 - 54.69.247.90/32 -
TCP: 80 and 443 to:
- 0.0.0.0/0 (to allow security, package, and ActZero updates) -
Keep the default 'AllowVnetOutBound' rule as the vulnerability scanner will require access to all internal subnets for the network scan.
-
Go further
- Set up log forwarding on all the firewalls in your network infrastructure.
Was this documentation helpful? Please send us your feedback!